From old bread to sumptuous pudding.

It’s extremely hard for 2 people to finish a loaf of bread before its expiration date. So we freeze bread to keep them longer and heat it up the in the toaster whenever a hankering for bread emerges.

That means I’d be eating toasts up until we get fresh bread. A great idea for my BF who LOVES toasts but I’d much prefer soft, pillowy, sinful white bread any day. And hence, I decided to make bread & butter pudding using bread that we couldn’t finish in time.

This recipe is adapted from BBC Food. Very easy and straightforward, just the kind of recipes that I love to keep.

    For the pudding:

  • Enough butter for spreading 6-8 slices of bread as well as greasing bowl
  • 6 – 8 slices of white bread
  • 50g sultanas
  • Cinnamon powder
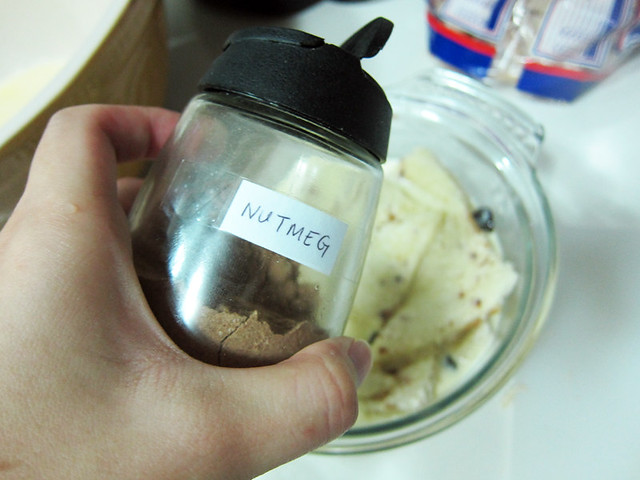
  • Nutmeg powder (or freshly grated ones if you’ve got it)
    For the custard:

  • 250ml of milk
  • 150ml of whipping cream
  • 2 eggs
  • 25gm of granulated sugar

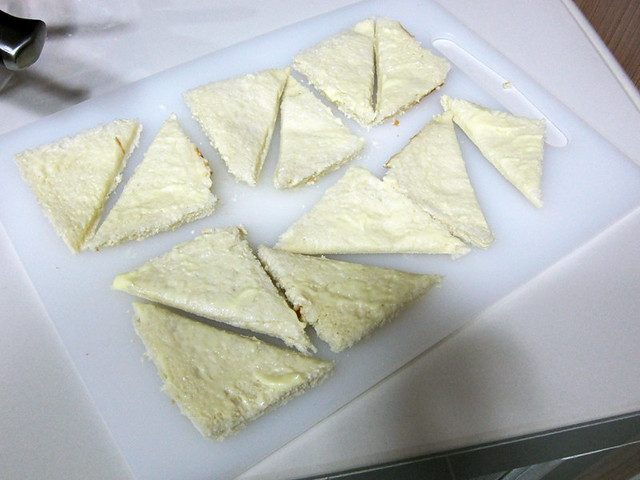
# – First, butter 6 slices of white bread and cut each into half, forming triangles.

# – Then lay 4 slices at the bottom of a lightly greased heat-proof bowl. Sprinkle some raisins all over.

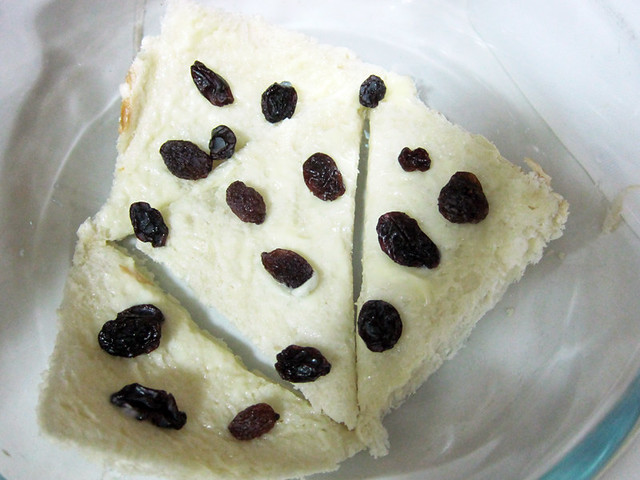
# – Add a sprinkling of cinnamon powder.

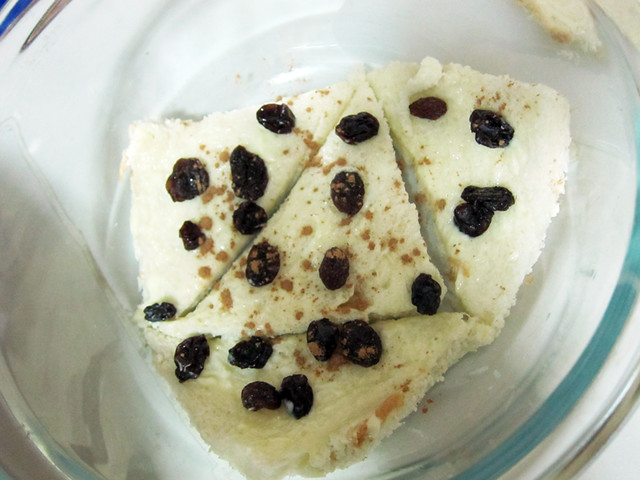
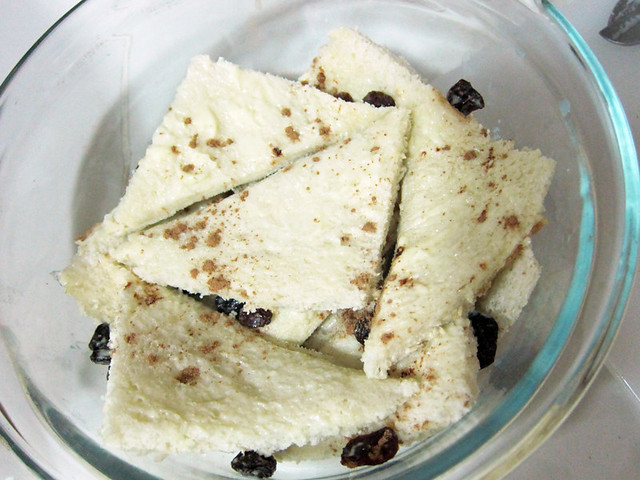
# – Add more layers of bread, raisins and cinnamon powder until you run out of bread.

# – Top off with a sprinkling of nutmeg for that extra oomph. If you’ve got no nutmeg, just cinnamon will do too ;)

Set the bread aside. It’s time to make the delicious custard!

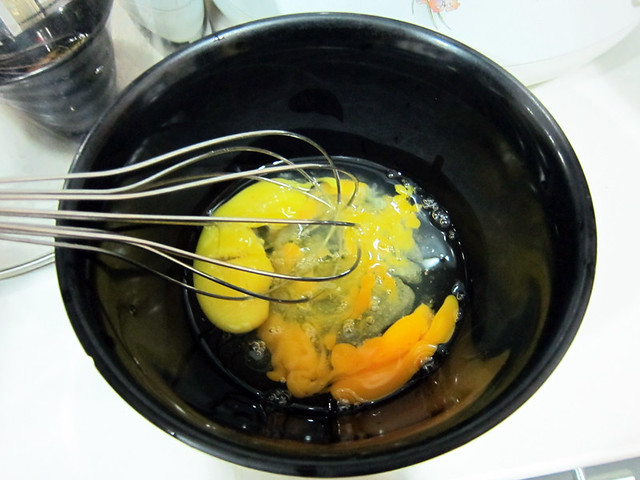
# – Whisk eggs and granulated sugar in a bowl until the colour turns pale.

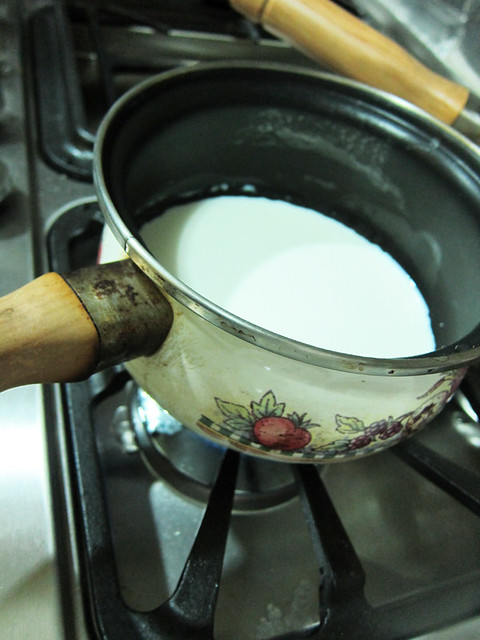
# – Heat up whipping cream and milk in a pot till scalding but not boiling.

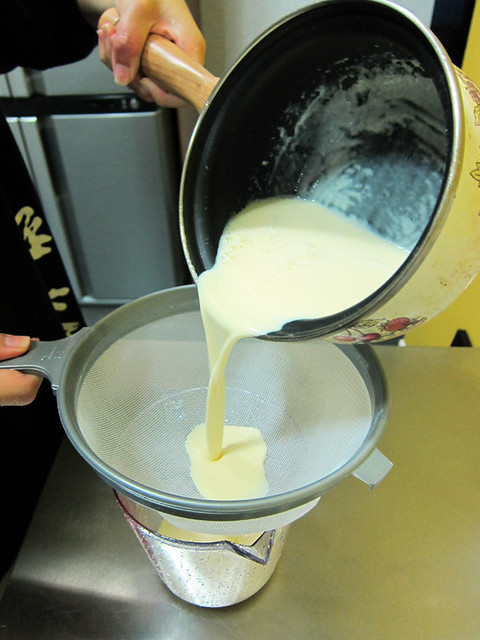
# – Pour egg mixture into the milk mixture and whisk till combines. Remove from heat.

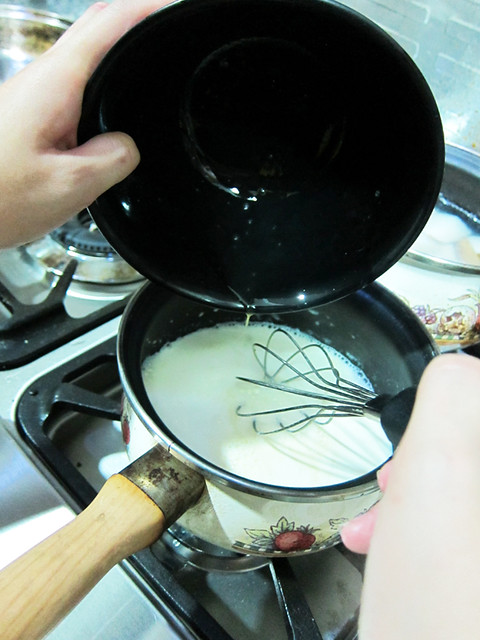
# – Strain the mixture to remove the stringy egg bits. Custard is now done :D

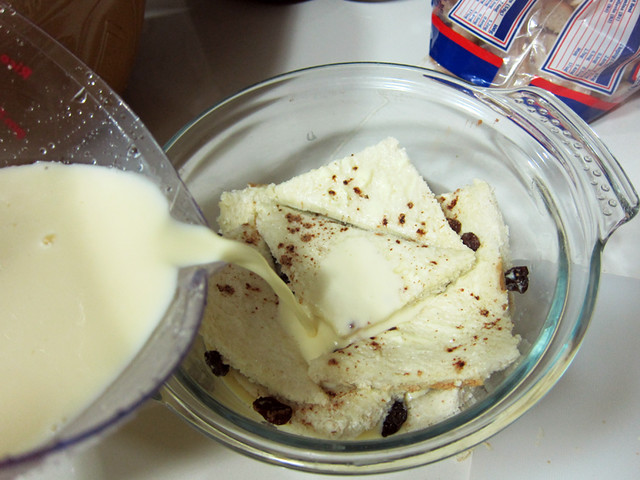
# – Pour the custard into the bread up until just the bottom of top layers are submerged. You will have more custard left so stick it in the fridge for some awesome chilled custard to serve with the pudding!

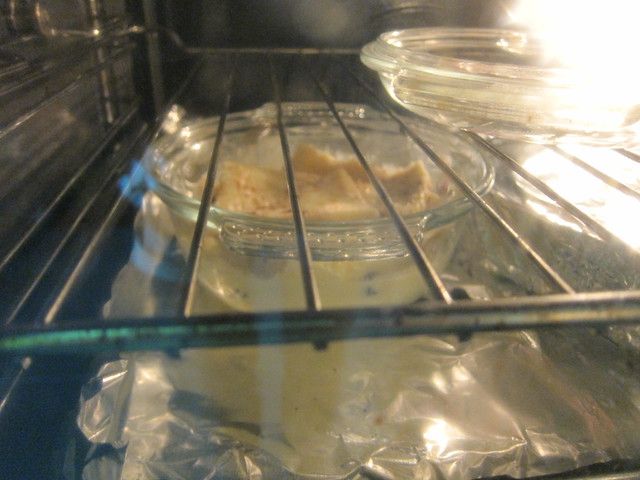
# – Stick it in a preheated oven at 175 degrees celcius for 30-40 minutes or until top is brown.

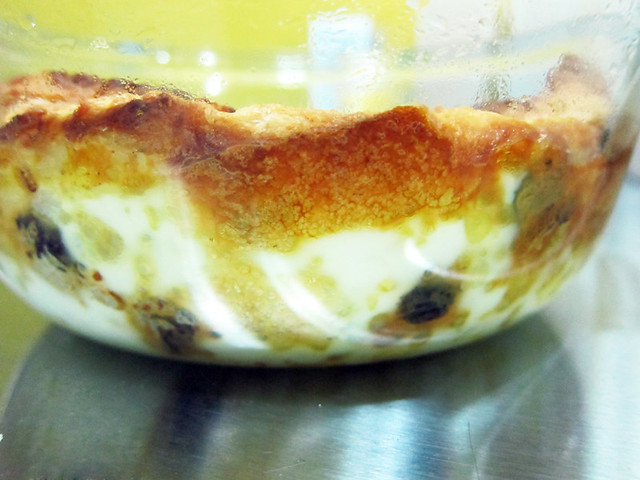
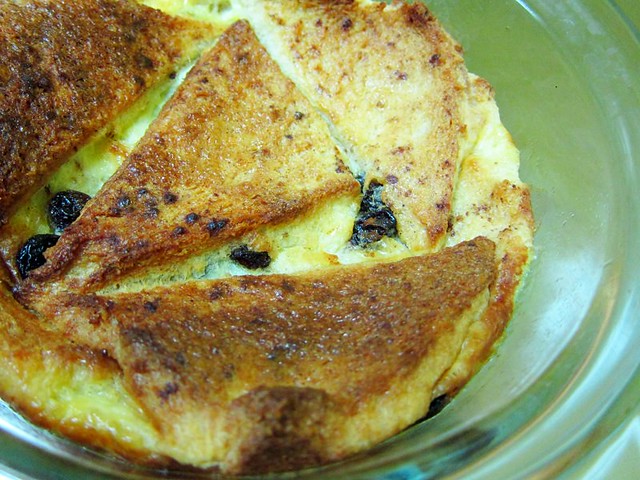
# – After 30 minutes, bread and butter pudding, DONE.

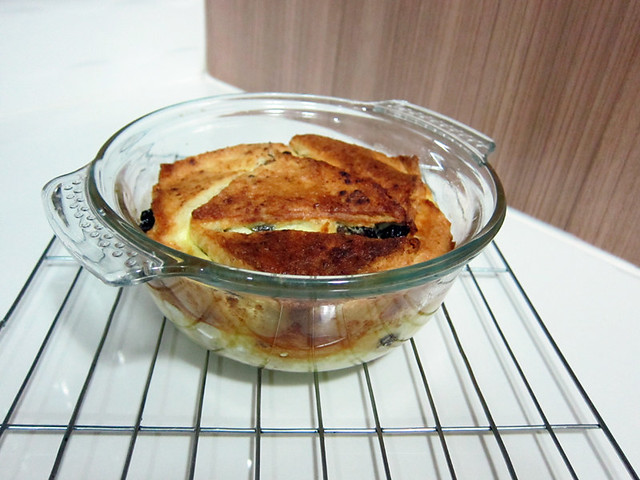
# – The beautiful, creamy, delicious bread & butter pudding.

Pour the chilled custard you’ve made earlier over the pudding and you’ve got yourself a delicious, belly-warming and very yummy dessert.

# – YUMMEH!

And yes, I can now have toasts because I want to and not because I have to!

Idiot proof way to poaching eggs.

How to poach an egg: Boil water, add some vinegar, stir water to create a whirpool-like effect, crack an egg into the eye of the “whirpool” and voila……poached eggs! Easy peasy right?

Nope. Not even close.

Poaching eggs is one of the single most difficult and frustrating things I’ve ever done in the kitchen. My eggs always disintegrate in the water. I often was not able to drain the eggs properly, resulting in something that remotely resembled a poached egg, which tasted of vinegary water. Nasty, nasty stuff.

They say you should use the freshest eggs but hello I don’t live on a farm and I don’t always want to eat poached eggs immediately after buying new eggs. And heck, I don’t even know how fresh the eggs are from the supermarket. On top of that, what exactly does “fresh” mean? Right out of the hen’s cavity? 1 to 2 days after birth? 1 to 2 weeks? Can somebody tell me?

So imagine how happy I was, when I managed to catch an episode of Master Chef Australia which taught the contestants how to poach an egg in a way entirely different from what I’ve read or watched before.

All you need are:

  • Clingwrap film
  • Eggs
  • Oil

# – First, tear out a clingwrap film about 25 cm by 25 cm for one egg. Lightly grease the middle with cooking oil. This step is important so that later, the cooked egg could slide off the film easily.

# – Lay the film over a small bowl or in my case, a muffin tray. Push the film down to make a hole.

# – Now crack an egg into the hole.

# – Gather all the excess cling film and twist.

# – Then tie a knot, like this.

# – Yay, four parcels of happiness!

# – Now heat up a pot with enough water to reach the level just below the parcel knots on low heat. Do not boil, just let it simmer (just some small bubbles instead of violently bubbling). Gently put the egg parcels in.

This is the moment where I implore you to get a kitchen timer. I got mine for only RM5 from Daiso.

  • If your eggs are right from the fridge and are really cold, simmer for 5 minutes.
  • If your eggs are room temperature, simmer for 3.5 – 4.5 minutes depending on how runny you like your yolks.

When the eggs are done, turn off heat and pick out the parcels from the water. Lay them on a towel to absorb some moisture. Then, place each parcel on top of a toast or muffin or bagel or whatever that you want to eat it with.

Cut off the parcel knot. Gently peel film off away from the egg. Now keep the egg steady with your finger or a spoon, gently pull the film out from under the egg.

# – And you’ll get a perfectly poached egg in a nice shape to boot. Serve with hollandaise sauce if you’re feeling fancy or in my case, just some pepper and salt atop a wholemeal toast ;)

So ladies & gentlemen, the idiot proof way to poaching eggs. No wastage. No worries about whether eggs are fresh or not. No scrubbing stray egg whites off pot. And most importantly, no more soggy, slightly tart poached eggs!

Update:

I understand there are concerns about subjecting the plastic clingwrap to high heat. Mine is a non-toxic clingwrap from Glad with temperature tolerance of up to 110 degrees celcius and also microwaveable. It’s also stated that it can be used for steaming food and with this in mind, I believe it can be treated with simmering water.

# – Temperature tolerance: 110 degrees celcius.

So do check that your clingwrap film is safe to be heated in simmering water!

Chinese Steamed Pork Ribs with Salted Soyabeans.

This is a dish that I grew up with and one that I’d always wanted to recreate since getting my own kitchen. Absolutely easy to make and so delicious, it’s no wonder that my mum served this for dinner at least once every week when I was younger.

The pork is juicy, tender and succulent. The salted soyabeans, or “taucu” makes a distinctive and delicious savoury sauce that goes extremely well with piping hot plain steamed rice. You can add more chillies for kicks but if you’ve got children at home, they can be omitted for a milder version.

Ingredients:

  • 400-500 grams of pork ribs
  • 2 tablespoon of salted soyabean paste or “taucu” (if they’re still in bean form, mash it with a fork or pestle & mortar or food processor)
  • 2 medium sized chilies or dried chillies, seeded and roughly chopped
  • 1 tablespoon of minced garlic
  • 2 tablespoons of minced shallots
  • 1 ginger about the size of a thumb, julienned
  • 5 tablespoons of water
  • 2 tablespoons of chopped spring onion (for garnish)

For marinating the pork:

  • 2 tablespoon of corn flour
  • 1 tablespoon of chinese rice wine
  • 1.5 tablespoon of sesame oil

If you don’t quite fancy visiting the morning market, it’s quite easy to get pork ribs at places like Tesco, Cold Storage and Jaya Grocer. The ones that I bought were about 400grams for just under RM12 from Cold Storage. I believe it’s probably slightly more expensive than the wet market but I guess you pay more for convenience.

# – Pork ribs from Cold Storage.

# – The ingredients for the sauce. Ginger not in picture thanks to my carelessness.

Lets begin…

# – Clean the pork ribs and cut them into more or less equal sizes then marinade with chinese rice wine, cornflour and sesame oil for at least 5 hours. Overnight is even better. So yes, adjust your timing as you don’t need to deal with the pork till about 1/2 hour before serving time.

# – When you’re ready to cook, heat up a pot with some cooking oil.

# – Throw in the marinaded pork ribs and brown them. No need to cook through. Remove them from the pan as soon as the pork changed colours from pink to patches of white.

# – Lay the pork out on the plate that you want to steam them in. Set aside. In my case, I used aluminium foil because I do not have plates that could fit into my steamer -_-

# – In the same pot, heat up a little bit of oil. Throw in the garlic, chillies and shallots. Fry till fragrant.

# – Next, throw in the ginger and fry it till you can smell the fragrance.

# – Put the salted soyabean paste and stir.

# – Add 5 tablespoons of water and stir. Let it simmer for a bit.

# – Remove the mixture from heat and pour it all over the pork ribs.

# – Steam for 20 minutes. If you don’t have a steamer, put a wire rack in a wok or very deep pan and fill it up with water. Make sure the wire rack is not submerged in water. When water starts boiling, put the plate of pork ribs onto the rack and cover with lid for 20 minutes. And if you’re using this makeshift steamer, remember to always check for water level and top up when it’s low.

After 20 minutes….

# – Garnish with spring onions. Delicious and very appetising chinese steamed pork ribs with salted soyabeans. DONE!

Be warned as it will makes you wolf down rice like a teenager!