No fuss pineapple jam recipe

So some of my readers probably know that my family and I have embarked on a permanent lifestyle change.

Other than the social media detox and etc that I mentioned earlier, we have also  removed grains, refined sugar and dairy from our diet. If you want to learn more about our diet (it’s called WildFit) check out my husband’s posts.

That means no rice, no wheat, no milk, no cheese, no candy bars, no a lot of many things.

It isn’t easy and we still find ourselves succumbing to these evil, delicious inflammatory food such as cheeses, cookies, crisps, ramen (happened today in fact urgh), briyani and laksa every now and then but we take solace in that our main everyday meals are 99% of the time – sugar, grain and dairy free. We also drink 2 x 400ml glasses of vegetable green smoothies (minimum 5 types of veges + chia seeds + virgin coconut oil) daily to stock up on micronutrients.

Anyway, Chinese New Year is fast approaching and of course, I had gotten a bit sad that I can’t bake and indulge on my signature chocolate chip cookies and pineapple tarts. Out of desperation, I decided to google for AIP friendly pineapple tart recipes.

AIP you ask? What’s that?

AIP stands for “auto-immune protocol” and it’s a special diet for people with autoimmune issues to get their immune system and gut back to health. Although we don’t have issues with our immune systems, I personally believe the AIP diet is possibly one of the healthiest diets out there. Needless to say, it also fits my no refined-sugar, no grain & no dairy rule.

I stumbled across this recipe and was really intrigued by its pineapple jam recipe. It uses oven with minimal stirring…..well, that sounds amazing!

Ain’t nobody got time standing over the stove stirring jam.

So I tried the recipe out. I used only two ingredients although the original recipe called for date paste (for extra sweetness) and a couple more spices but I don’t think it needs them. Anyway, it’s your call.

Ingredients:

2 ripe large pineapples

1 tablespoon of cinnamon powder

This recipe yields about 350gms of jam.

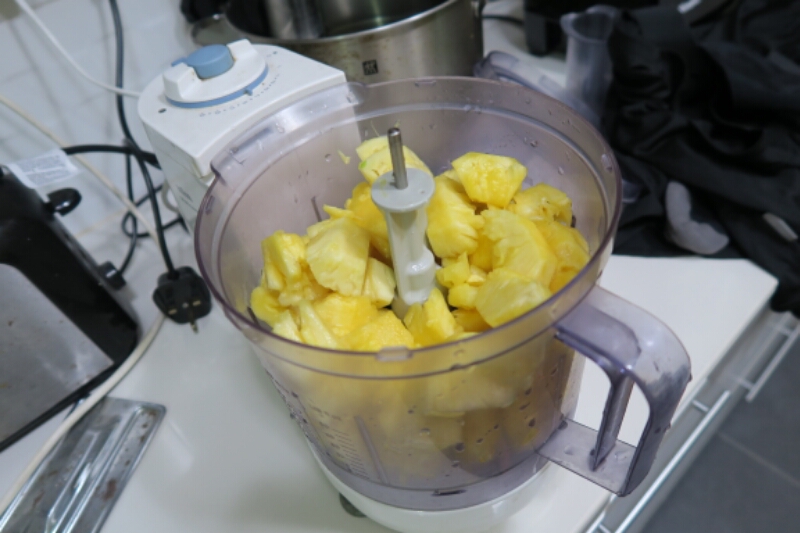
# – Firstly,  peel and core the pineapples. Google how to peel/cut pineapple if you are not sure how.

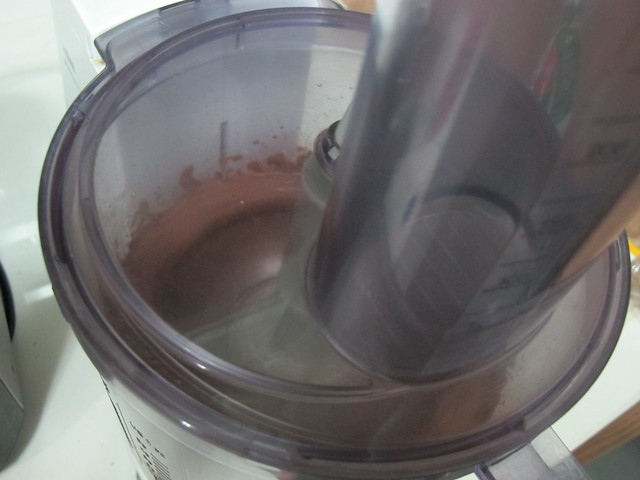
# – Then, cut the pineapples into cubes and throw them into your food processor/blender. Add the ground cinnamon too. Blitz till puree consistency.

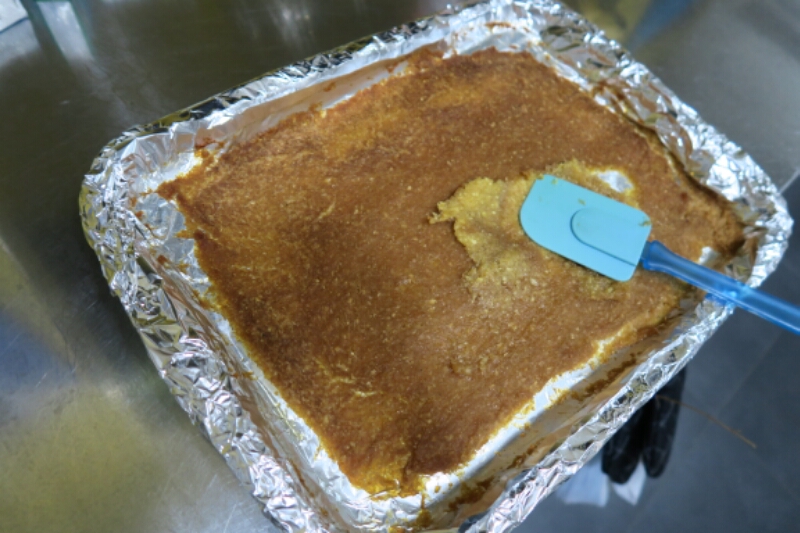
# – Now pour into a baking tray lined with aluminium foil. I lined my tray 3 times to prevent leakage. Then, put the tray in preheated oven of 80 degrees celcius. Stir once every hour for 4 hours with a rubber/silicon spatula. I advise against using a metal spoon cause it might puncture the aluminium foil.

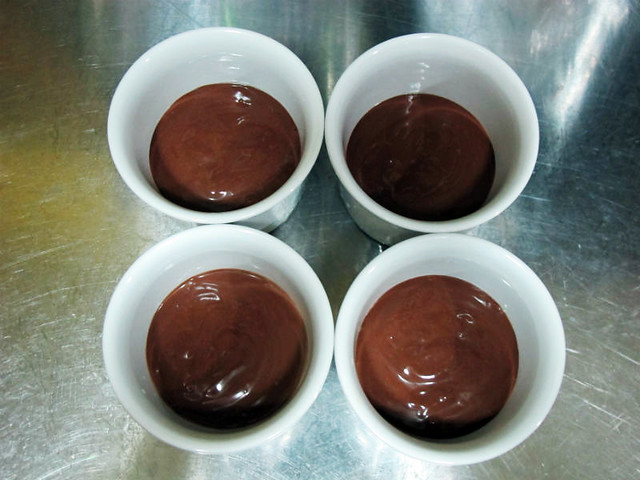
# – Then, lower the temperature to 70 degrees celcius and leave it in the oven for and extra 8-12 hours. I did it at dinner time then went to bed and woke up next day to the aroma of pineapple jam. See how much liquid has evaporated after a total 12 hours.

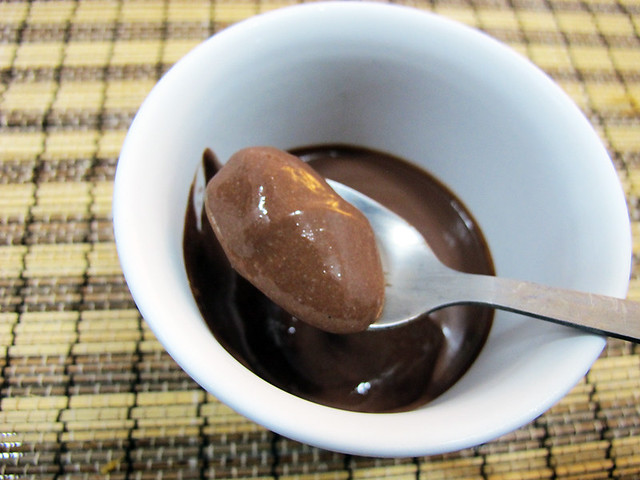
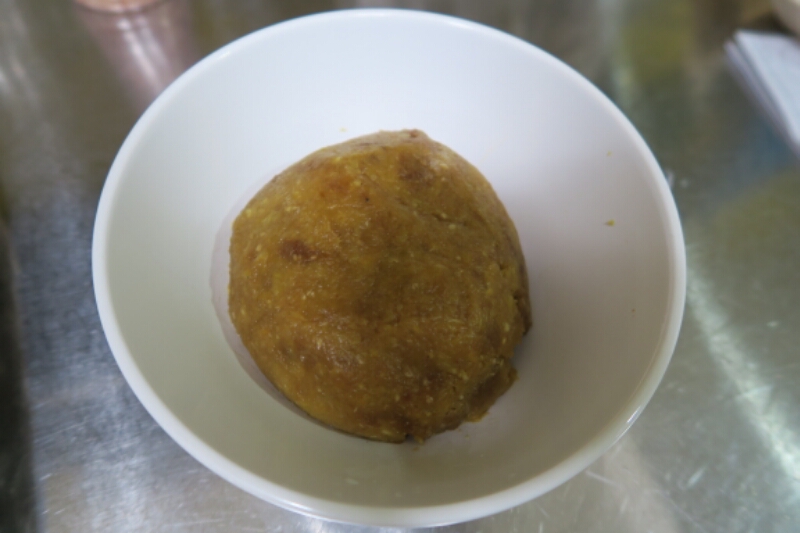
# – Scoop the jam into a bowl and let chill in the fridge. It will be even firmer and roll-able after chilling. Taste so yummy!!

There’s really no need to add more refined sugar to pineapple jam. The pineapples themselves are naturally sweet enough and even more so when concentrated.

Hope this recipe will help you who are looking for a fuss free yet healthy pineapple jam recipe.

Next post will be the recipe of the actual paleo and AIP friendly pineapple tarts (I hope). Stay tuned.

This healthy chocolate pudding is so tasty you won’t believe you’re eating tofu!

Seriously!

Now that I’m breastfeeding, I’ve been a bit more careful with what I put in my body. As it turns out, what you eat really does affect the breastmilk.

So far, I’ve completely cut out chillies and almost all dairies from my diet because it’s a difference between my baby sleeping for 4 hours straight or wailing every 30 minutes. Thus my search for delicious dairy-free desserts. I wasn’t even sure if there’s such a thing!

So, when I  found the recipe for this dairy-free chocolate pudding, I was understandably skeptical. It uses, tofu.

Tofu!? What? Gross?

But curiousity got the better of me. And I had a block of silken tofu in my fridge.

Ingredients

  • 1 block or 300 gm of silken tofu
  • 2 tablespoon of cocoa powder
  • 100 ml of maple syrup (or to taste)
  • 2 teaspoon of vanilla extract

And it’s so incredibly easy to make this dessert. And so delicious!!

# – The ingredients

# – First, dump the tofu into a food processor.

# – Followed by cocoa powder and then vanilla extract.

# – Lastly, the maple syrup. You can use honey as a substitute.

# – Then, hit blitz till everything’s incorporated and smooth and soft.

# – Divide mixture into 4 ramekins.

# – Chill in the fridge for a few hours or more until firmer.

# – Finally, eat! You can serve with fruits and berries and whipped cream but I couldn’t be bothered.

It’s incredibly chocolatey with a slight nutty taste from the tofu. Surprisingly creamy but also light and fluffy at the same time. There’s no need for me to convince you that this is as healthy as healthy goes for a delicious chocolate pudding.

No milk, no cream, no eggs, no sugar. Just natural sweetener, pure cocoa powder and TOFU!

Yes, tofu! Am still trying to believe this hahaha

Also, this is incredibly cheap if you used honey instead of maple syrup….imagine, that one block of tofu was only RM0.99!

Go on, make it. Am heading out to get like 10 blocks of tofu.

A few things I cooked in the past months.

I am consciously trying not to write about babies and hormones. So I am going to blog about food instead.

+++++++++++++++

A while ago, I attempted to make Seremban beef noodle, one of my favourite things to eat pre-preggers.

Seremban beef noodle is quite different from KL’s. The former is lighter and has a variety of textures while the latter is richer and more punchy in flavours.

It was easier to cook than I initially thought, and the recipe I used was from this lovely blog.

# – My first Seremban beef noodle attempt.

I used Korean udon noodles, which were a tad too stodgy for my taste, so stick to chinese rice noodles!

I have since developed a disdain for innards of any kind, so I probably won’t make this dish until after the baby has arrived.

+++++++++++++

Another thing I really loved pre-preggers was salt beef. The only place I know that serves good salt beef is Nutmeg at Bangsar Village 2.

Salt beef is just a cheap cut of beef that has been cured and then boiled, so instead of paying extra I decided that I should make them myself.

The recipe I used is from The Telegraph.

# – Cure brisket in spiced brine.

# – After 7 days…

# – Poach for 3 hours until tender.

# – Salf beef, DONE!

We ate it with potatoes and Dijon mustard. Well, must say I was a little underwhelmed despite the amount of effort put in to make the dish.

So, I think I will stick to going to Nutmeg (after baby comes cause the idea of eating salf beef right now makes me want to hurl), hehehe.

++++++++++++++

I friggin loveeeeeeeee hummus. I could eat it everyday. It’s quite a pity that hummus is not a more common sight at supermarkets here.

Fortunately, it’s very easy to make hummus, if you cheated….

The traditional way of making hummus is complicated, you have to pre-soak and grind the chickpeas, grind sesame seeds till they become paste, boil olive oil till it’s scalding hot etc etc but the angmoh way of doing it is very easy…just blitz with a food processor. Don’t even need cooking.

The recipe I used is from BBC.

# – Stick canned chickpeas, tahini (sesame paste), crushed garlic, lemon juice, ground cumin, olive oil, salt and water into the food processor.

# – Blitz and season if needed.

# – Serve with flat bread….so healthy and easy.

Use it like a bread spread too in sandwiches..healthier than butter. Yummy!

+++++++++++++

I had leftover pears, so I made a pear cake. I used a recipe from this blog, and it’s easily one of the easiest things I’ve ever baked.

Looks quite beautiful too I must say. The sponge was light and fluffy, the pears were soft and chewy. Yums.

# – Italian pear cake.

# – Served with vanilla ice cream.

++++++++++++++

Lastly, I made Gordon Ramsay’s pork neck curry again. I used shoulder loin (funnily, they are also called butt) and it worked very well.

Instead of mango salsa, I made apple salsa because I forgot to buy mangoes and I had loads of apples in the fridge. They worked well…just cubed apples, halved tomato cherries, lemon juice, salt & pepper and a handful of pea sprouts.

# – Yummy yum yum….served with rice.

++++++++++++++

That’s all, kthxbai.