Idiot proof way to poaching eggs.

How to poach an egg: Boil water, add some vinegar, stir water to create a whirpool-like effect, crack an egg into the eye of the “whirpool” and voila……poached eggs! Easy peasy right?

Nope. Not even close.

Poaching eggs is one of the single most difficult and frustrating things I’ve ever done in the kitchen. My eggs always disintegrate in the water. I often was not able to drain the eggs properly, resulting in something that remotely resembled a poached egg, which tasted of vinegary water. Nasty, nasty stuff.

They say you should use the freshest eggs but hello I don’t live on a farm and I don’t always want to eat poached eggs immediately after buying new eggs. And heck, I don’t even know how fresh the eggs are from the supermarket. On top of that, what exactly does “fresh” mean? Right out of the hen’s cavity? 1 to 2 days after birth? 1 to 2 weeks? Can somebody tell me?

So imagine how happy I was, when I managed to catch an episode of Master Chef Australia which taught the contestants how to poach an egg in a way entirely different from what I’ve read or watched before.

All you need are:

  • Clingwrap film
  • Eggs
  • Oil

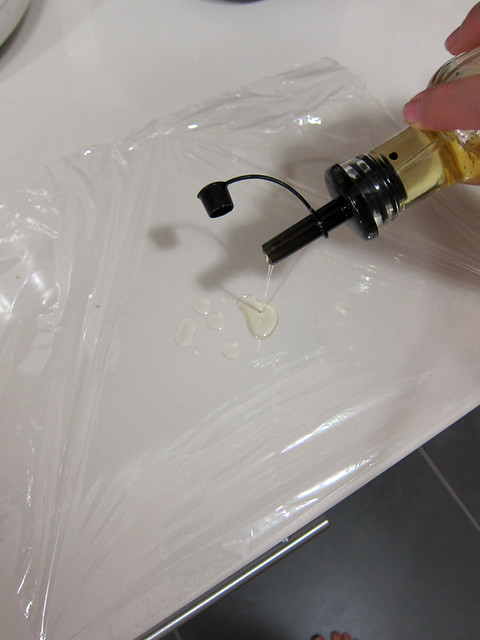
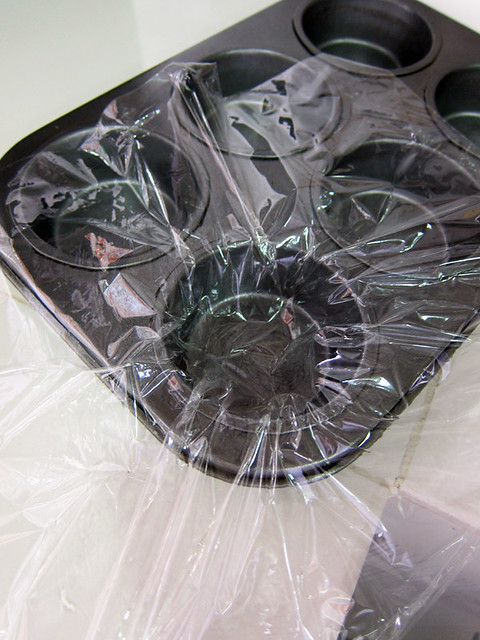
# – First, tear out a clingwrap film about 25 cm by 25 cm for one egg. Lightly grease the middle with cooking oil. This step is important so that later, the cooked egg could slide off the film easily.

# – Lay the film over a small bowl or in my case, a muffin tray. Push the film down to make a hole.

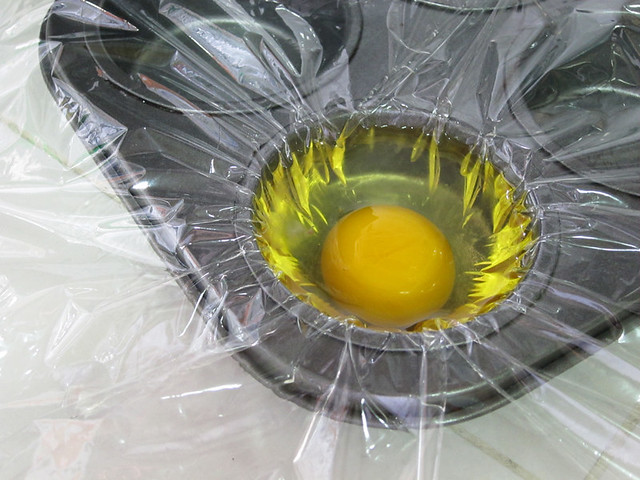
# – Now crack an egg into the hole.

# – Gather all the excess cling film and twist.

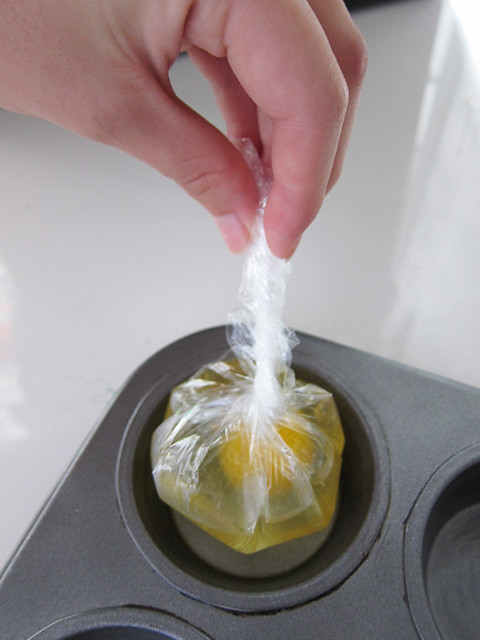
# – Then tie a knot, like this.

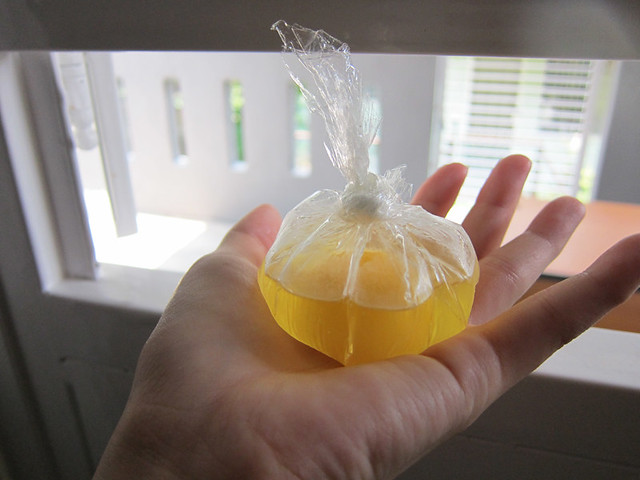
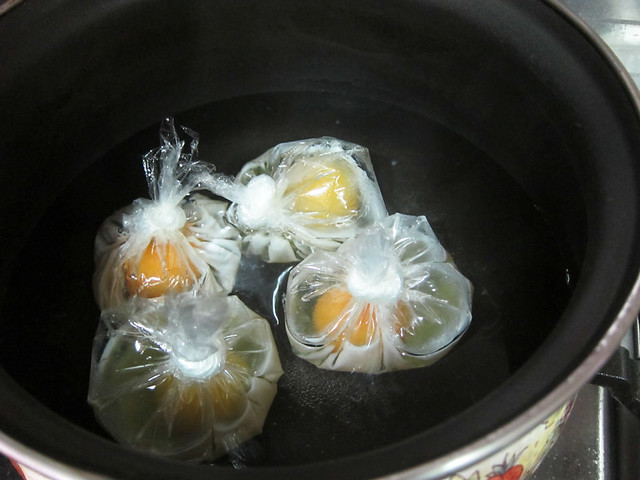
# – Yay, four parcels of happiness!

# – Now heat up a pot with enough water to reach the level just below the parcel knots on low heat. Do not boil, just let it simmer (just some small bubbles instead of violently bubbling). Gently put the egg parcels in.

This is the moment where I implore you to get a kitchen timer. I got mine for only RM5 from Daiso.

  • If your eggs are right from the fridge and are really cold, simmer for 5 minutes.
  • If your eggs are room temperature, simmer for 3.5 – 4.5 minutes depending on how runny you like your yolks.

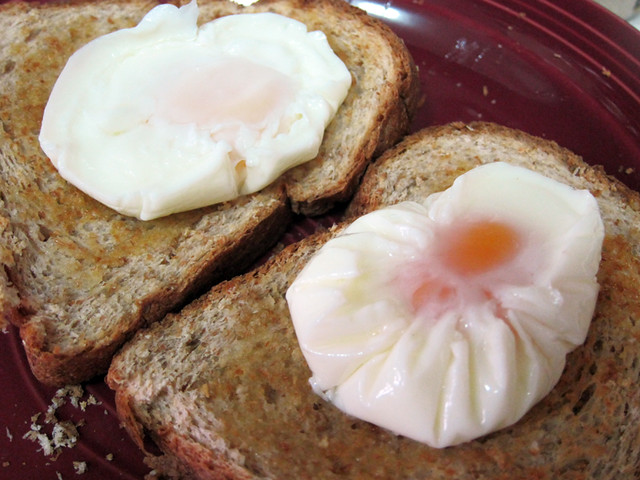
When the eggs are done, turn off heat and pick out the parcels from the water. Lay them on a towel to absorb some moisture. Then, place each parcel on top of a toast or muffin or bagel or whatever that you want to eat it with.

Cut off the parcel knot. Gently peel film off away from the egg. Now keep the egg steady with your finger or a spoon, gently pull the film out from under the egg.

# – And you’ll get a perfectly poached egg in a nice shape to boot. Serve with hollandaise sauce if you’re feeling fancy or in my case, just some pepper and salt atop a wholemeal toast ;)

So ladies & gentlemen, the idiot proof way to poaching eggs. No wastage. No worries about whether eggs are fresh or not. No scrubbing stray egg whites off pot. And most importantly, no more soggy, slightly tart poached eggs!

Update:

I understand there are concerns about subjecting the plastic clingwrap to high heat. Mine is a non-toxic clingwrap from Glad with temperature tolerance of up to 110 degrees celcius and also microwaveable. It’s also stated that it can be used for steaming food and with this in mind, I believe it can be treated with simmering water.

# – Temperature tolerance: 110 degrees celcius.

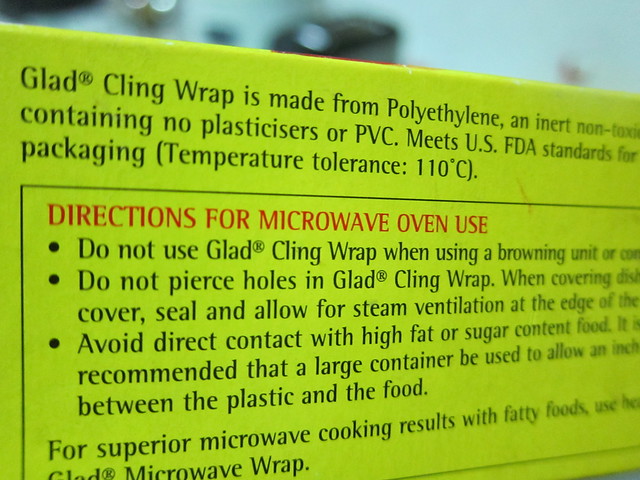
So do check that your clingwrap film is safe to be heated in simmering water!

Chinese Steamed Pork Ribs with Salted Soyabeans.

This is a dish that I grew up with and one that I’d always wanted to recreate since getting my own kitchen. Absolutely easy to make and so delicious, it’s no wonder that my mum served this for dinner at least once every week when I was younger.

The pork is juicy, tender and succulent. The salted soyabeans, or “taucu” makes a distinctive and delicious savoury sauce that goes extremely well with piping hot plain steamed rice. You can add more chillies for kicks but if you’ve got children at home, they can be omitted for a milder version.

Ingredients:

  • 400-500 grams of pork ribs
  • 2 tablespoon of salted soyabean paste or “taucu” (if they’re still in bean form, mash it with a fork or pestle & mortar or food processor)
  • 2 medium sized chilies or dried chillies, seeded and roughly chopped
  • 1 tablespoon of minced garlic
  • 2 tablespoons of minced shallots
  • 1 ginger about the size of a thumb, julienned
  • 5 tablespoons of water
  • 2 tablespoons of chopped spring onion (for garnish)

For marinating the pork:

  • 2 tablespoon of corn flour
  • 1 tablespoon of chinese rice wine
  • 1.5 tablespoon of sesame oil

If you don’t quite fancy visiting the morning market, it’s quite easy to get pork ribs at places like Tesco, Cold Storage and Jaya Grocer. The ones that I bought were about 400grams for just under RM12 from Cold Storage. I believe it’s probably slightly more expensive than the wet market but I guess you pay more for convenience.

# – Pork ribs from Cold Storage.

# – The ingredients for the sauce. Ginger not in picture thanks to my carelessness.

Lets begin…

# – Clean the pork ribs and cut them into more or less equal sizes then marinade with chinese rice wine, cornflour and sesame oil for at least 5 hours. Overnight is even better. So yes, adjust your timing as you don’t need to deal with the pork till about 1/2 hour before serving time.

# – When you’re ready to cook, heat up a pot with some cooking oil.

# – Throw in the marinaded pork ribs and brown them. No need to cook through. Remove them from the pan as soon as the pork changed colours from pink to patches of white.

# – Lay the pork out on the plate that you want to steam them in. Set aside. In my case, I used aluminium foil because I do not have plates that could fit into my steamer -_-

# – In the same pot, heat up a little bit of oil. Throw in the garlic, chillies and shallots. Fry till fragrant.

# – Next, throw in the ginger and fry it till you can smell the fragrance.

# – Put the salted soyabean paste and stir.

# – Add 5 tablespoons of water and stir. Let it simmer for a bit.

# – Remove the mixture from heat and pour it all over the pork ribs.

# – Steam for 20 minutes. If you don’t have a steamer, put a wire rack in a wok or very deep pan and fill it up with water. Make sure the wire rack is not submerged in water. When water starts boiling, put the plate of pork ribs onto the rack and cover with lid for 20 minutes. And if you’re using this makeshift steamer, remember to always check for water level and top up when it’s low.

After 20 minutes….

# – Garnish with spring onions. Delicious and very appetising chinese steamed pork ribs with salted soyabeans. DONE!

Be warned as it will makes you wolf down rice like a teenager!

Making Syrup Bites – you will love it like I do.

When the BF’s mom came to visit a couple of months ago, she brought along an old recipe book that belonged to the BF. It was given to him by his aunt when he moved away to Liverpool for university, in hopes that he would not need to survive on just instant noodles and 1 quid beers.

Thanks to Aunt Jean and that precious recipe book, my BF learned valuable cooking skills which proved very handy whenever I messed up his dinners.

# – The Dairy Book of Home Cookery.

The Dairy Book of Home Cookery now belongs to me. It mostly consists of basic recipes for almost any food you can imagine. One recipe that caught my eye was “Syrup Bites”. Personally, I have never heard of it and even googling did not yield any result. What does it look like? How does it taste like?

# – Syrup Bites?

And because I had all the ingredients in hand, I decided to make 24 pieces of “Syrup Bites”. I’m so glad I did, because they are absolutely DELICIOUS!

Ingredients A

  • 100 grams of self raising flour
  • 75 grams of rolled oats
  • 25 grams of dessicated coconut

Ingredients B

  • 1 teaspoon of bicarbonate of soda
  • 1 tablespoon of milk

Ingredients C

  • 100 grams of caster sugar (I reduced it from the original 125 grams)
  • 100 grams of butter
  • 2 tablespoons of golden syrup (you can also use honey or treacle)

# – First of all, mix Ingredients A (oat, self raising flour and dessicated coconut) together in a bowl and set aside.

# – Then, mix Ingredients B (milk and bicarbonate of soda) together in a small bowl and stir until bicarbonate of soda dissolves. Set aside.

# – Next, heat up a pot and put all of Ingredients C (butter, sugar and golden syrup) into it. Keep stirring till everything’s melted.

# – Pour ingredients B into the sugary, buttery mixture. Keep stirring.

# – The mixture will expand quite a bit, don’t panic and just keep on stirring. Remove from heat.

# – Now pour the concoction into Ingredients A.

# – Keep stirring until everything is mixed up like this. Leave to cool for 30 minutes or until quite firm.

# – Roll into 24 round pieces. To be honest, it was actually quite difficult to roll, you’d likely find yourself compressing it within your palm till it forms a ball.

# – Lay them out on a greased baking tray with parchment paper. Leave some space between each ball for expansion.

# – Stick it in a preheated oven at 180 degrees celcius for 15minutes.

# – 15 minutes later, golden brown, oat-ey goodness!

# – They will feel rather soft right out of the oven, but leave them on a wire rack to cool completely and they shall firm up entirely.

# – Perfect with creamy cold milk.

# – So this is how “Syrup Bites” look like.

After some research, I realised that Syrup Bites is actually very similar to ANZAC biscuits, which were created during World War 1 for soldiers’ rations. As it doesn’t have eggs, they keep really long as long as there’s no moisture.

On it’s own, it’s very crunchy without being dry and the buttery coconut-ty sweet golden syrup taste is simply to die for! When dipped in cold milk however, it softens up slightly and become a whole new level of delicious.

And because it’s got so much oats, I’d like to think that it’s healthy, almost ;)