How I made an awesome 3D horse head light.

This is the only picture I have of our old wall light for our staircase landing. Got it from a shop in Damansara Uptown, Petaling Jaya. It is now no more.

# – Old wall lamp for our staircase landing.

Less than a year after installing the light, it literally fell apart from the inside. The starters disintegrated upon touch, making it impossible to replace the lamps.

It was the most expensive light we paid for, yet it’s the shittiest one argh!

Had to get my electrician to come in to fix the starters and all. Then few weeks later, the lamp cover fell off from its base and died into a million pieces. FOL.

Yeap, it fell off from the wall, in the middle of the freaking night…we thought we were being burglarised. Stupid piece of shit!

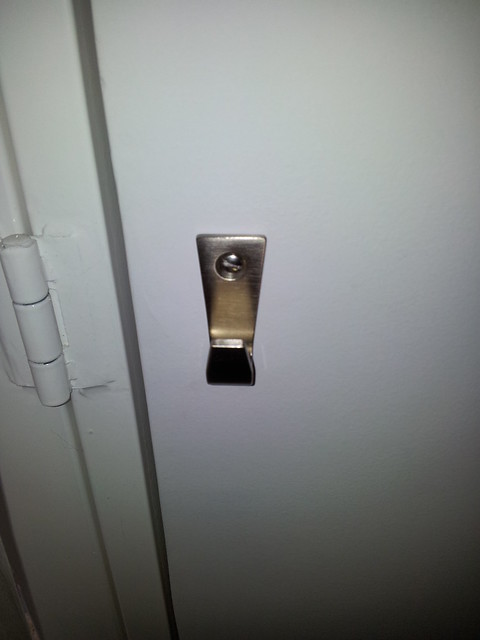
The insides still work (because we got the electrician to come fix it remember?) so all that’s missing is a cover.

I wasn’t keen on buying a completely new light because I’d have to bring in the electrician again so we left it alone. Until I stumbled upon a picture of a horse head on a wall.

Talk about a lightbulb moment!

The next day, I bought some steel wire from the neighbourhood hardware store and craft tissue from CzipLee.

I also got a bag of tapioca flour…intrigued?

# – First, I measured the diameter of the existing lamp base that’s attached on the wall. Then I shaped a frame according to the measurement.

# – The I started building a shape from the frame. Gradually, it became this. The view from the side.

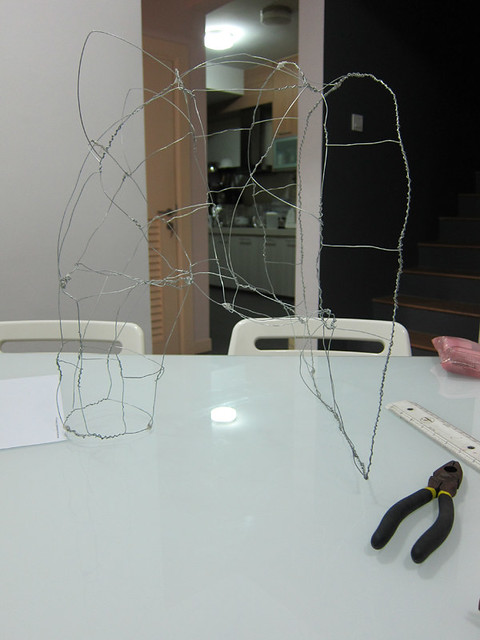
# – View from back. I was basing the shape on a picture of a horse head I printed off Google.

# – As I didn’t bother buying a craft plier, I was using a bigass lineman’s plier which made my wire joints a little less elegant.

Now it’s time to make glue…with tapioca! I felt like I was back in primary school, woohoo!

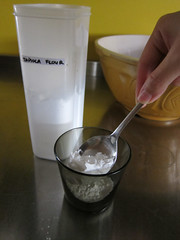
# – (1) Put 2 tablespoons of tapioca flour in a small cup. (2) Add 6 tablespoons of water. (3) Mix until no lumps and resemble milk.

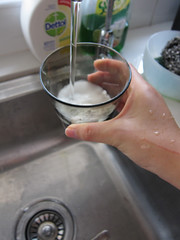
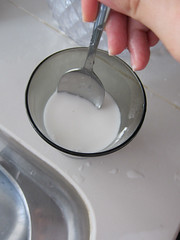
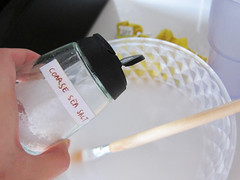
# – (4) Pour 400 ml of boiling water into a bowl. (5) Pour the milky mixture into hot water while stirring. It will start thickening. (6) Add 5 tablespoons of salt and stir until dissolve. (7) Tapioca glue, DONE! Make sure it’s neither too thick (add water) or too watery (add milky mixture). Glossy and sticky is the best.

# – Use a paint brush to liberally apply tapioca glue onto sections of craft tissue and cover the metal wire frame. You don’t have to be precise because it’s very forgiving. I didn’t even use scissors to cut the tissue into sections, just tore it off. If you got tears or holes, just add more tissue!

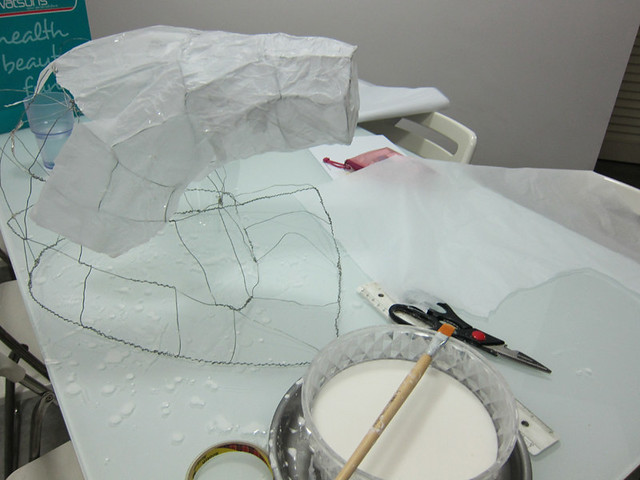
# – Cover every part except the back of the structure. Then leave to dry overnight.

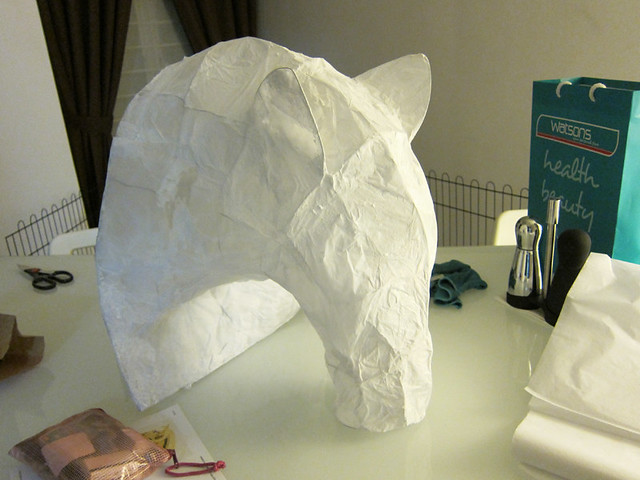
# – When completely dried, hang it over the base of the lamp.

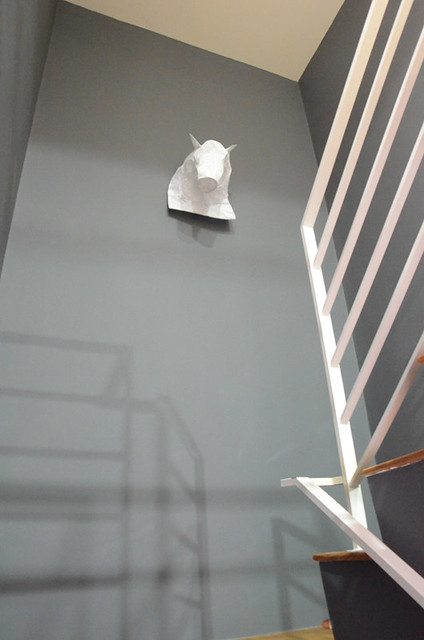
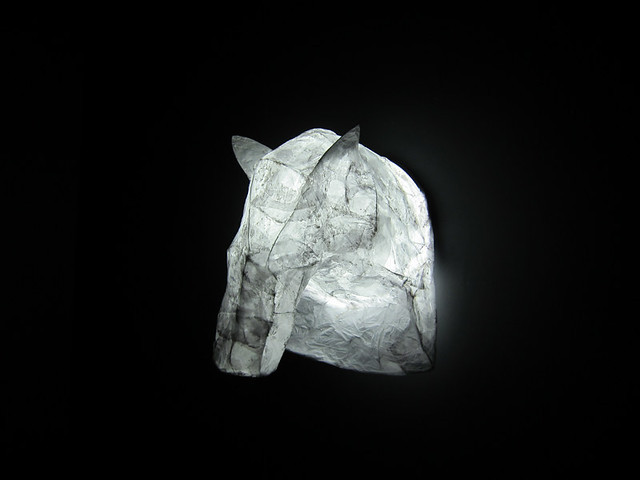
# – Then, turn on the lights :D

# – Horse head light, DONE!

So what do you think? Personally, I LOVE IT! Suddenly, this has become my favourite part of the house! Hehehe.

My kitchen says yellow.

I’m so happy. It’s been a year since we renovated the house and finally, the kitchen is complete. Truly complete! DANCE! DANCE! DANCE!

We have a mustard yellow wall in the kitchen. The plan was to hang up some pictures and shelves with an aluminium table underneath for dry working space.

For more than a year, all that materialised was only the aluminium table. The shelves and pictures lied around collecting dusts. We never found time.

# – The aluminium table.

Actually I have a lot of storage space in the kitchen thanks to the cabinets, but I refrained from storing my baking supplies behind the closed cabinet doors because:

1. I will actually forget where things are and will get frustrated searching for them. /scatterbrained
2. Out of sight, out of mind…baking supplies will expire before I bake anything!

So, I just arranged them on the table (see picture above). The downside, working on the table became very inconvenient as flours & sugars etc get trapped behind the containers.

As time passed, I’d also started to put more and more things on the table, such as the knives & kitchen scale which I want stored away from moisture yet still accessible. My work space shrunk even more.

Just few days ago I totally burnt my arm trying to maneuver a massive freshly baked chocolate salted caramel tart because I didn’t have sufficient space bla bla bla long story. I realised I could take no more.

Mission: to install shelves and hang the pictures!

# – Hubs screwing in the final screw to the first shelf.

# – Then the second shelf.

# – Install some hooks on the lower shelf too for hanging bananas or drying out a Peking Duck :D

# – I slowly moved all my recipe books from upstairs to the kitchen.

# – The pictures, which we bought from Cambodia and did not see the light of day since 2006 finally hung, framing the shelves. My recipe books are now home and my baking supplies are still accessible without eating up my workspace!

# – :)

Thanks hubs for installing the shelves <3

Drill it.

For the longest time, the aluminium curtain tracks in our home bugged the shit out of me.

# – Fugly aluminium curtain tracks.

I couldn’t hide them because I didn’t have curtain hooks, hence I couldn’t tie the curtain back and hence I couldn’t attach the top of the curtains together to hide the damn track.

I’m not entirely sure if you’d get what I’m talking about but anyway…the gist is: I had to install curtain hooks which involved drilling walls using a power drill so I could tie back my curtains.

For some reason, I had decided that I was unable to use one. A power drill that is. That I would rip my walls apart and then drill through my own hand; one of the dozens of tragic scenarios I’ve had managed to conceive.

# – Gory.

One afternoon, while the BF was at the pub watching rugby, I ate 5 tablespoons of pure peanut butter. Heap, not level.

I guess you can call it sugar high or more accurately, The Moment of Madness, I skipped into our storage room and skipped out with the Bosch Power Drill. Then I proceeded to read through the manual. I also watched a few youtube videos, just in case.

I was like, fuck it….if the walls ripped apart I could plaster it back and if I drilled through my hand I could stitch it up. Yeap, sugar makes me crazy.

So I started drilling and miraculously, the drill did not slide off the intended path. I also did not rip the wall apart and I also did not injure myself. Instead, I made a clean, deep hole. WOW.

I proceeded to screw a curtain hook in with my two hands and a screwdriwer. All those eggs in slow carb diet have made me STRONG.

# – My first hook in a hole.

Then I started making more holes, and installed more curtain hooks. One screw did break in the middle while I was screwing it in (told you I’m strong) but I didn’t panic. I just put in a shorter screw…

And then I attached the top of the curtains together, tie the hanging fabric back and voila…

# – No more annoying aluminium track offending my eyes.

And hence the conclusion of my story about drilling my very first hole in wall. Thanks for reading.